
🍞 Homemade Bread in the Air Fryer: A Complete Guide
Introduction
There is something irresistibly comforting about the smell of freshly baked bread wafting through the kitchen. Traditionally, making homemade bread required hours of kneading, proofing, and baking in an oven. But with the rise of kitchen gadgets like the Air Fryer, this process has become not only easier but faster—without compromising that beautiful golden crust and fluffy, warm interior.
In recent years, the air fryer has become a staple appliance in many households. Initially hailed for its ability to make crispy fries with minimal oil, the air fryer has proven to be an incredibly versatile tool. From juicy meats to delicate pastries, and now to artisan-style bread, the air fryer continues to amaze.
Making bread in an air fryer might sound unconventional to seasoned bakers, but it’s a game-changer for busy people, beginners, or anyone living in small spaces. Whether you’re a student in a dorm, someone living in a small apartment, or simply someone looking to simplify homemade baking, this method is for you.
In this comprehensive article, we’ll cover:
-
Why bake bread in an air fryer?
-
Ingredients and equipment needed
-
Step-by-step instructions with tips
-
Variations and ideas (e.g., garlic, herbs, cheese)
-
How to store and reheat
-
Troubleshooting common problems
-
Conclusion and final thoughts
So, tie your apron, get your ingredients ready, and let’s embark on a culinary adventure to bake soft, golden, and delicious bread—right in your air fryer!
Why Make Bread in the Air Fryer?
Before we dive into the actual recipe, let’s explore the benefits of using an air fryer for baking bread:
✅ Speed and Efficiency
Air fryers heat up quickly and cook food faster due to their compact size and convection-style airflow. This translates to shorter baking times compared to conventional ovens.
✅ No Need for Large Ovens
Perfect for small kitchens or places where traditional ovens are not available. You only need a countertop and an outlet.
✅ Crispy Crust, Soft Center
The circulating hot air helps achieve that perfect crusty exterior while keeping the interior fluffy and moist—just like bakery bread!
✅ Energy-Saving
Air fryers use less energy than traditional ovens, which is an added bonus for your electricity bill.
✅ Beginner-Friendly
The controlled environment and smaller size make it easier for beginners to get good results, even on their first try.
Basic Air Fryer Bread Recipe
This recipe will guide you through making a classic white bread loaf in your air fryer. We’ll also provide variations later in the article.
📝 Ingredients
| Ingredient | Quantity |
|---|---|
| All-purpose flour | 3 cups (375g) |
| Warm water (110°F) | 1 cup (240 ml) |
| Active dry yeast | 2 ¼ tsp (1 standard packet) |
| Granulated sugar | 1 tbsp |
| Salt | 1 tsp |
| Olive oil or butter | 2 tbsp |
🔁 Optional Add-ins: chopped herbs, shredded cheese, roasted garlic, seeds, etc.
🧰 Equipment Needed
-
Air fryer (minimum 4-quart capacity recommended)
-
Mixing bowls
-
Wooden spoon or stand mixer with dough hook
-
Kitchen towel or plastic wrap
-
6-inch round cake pan, loaf pan, or silicone baking mold
-
Pastry brush (for egg wash or butter)
-
Parchment paper (optional)
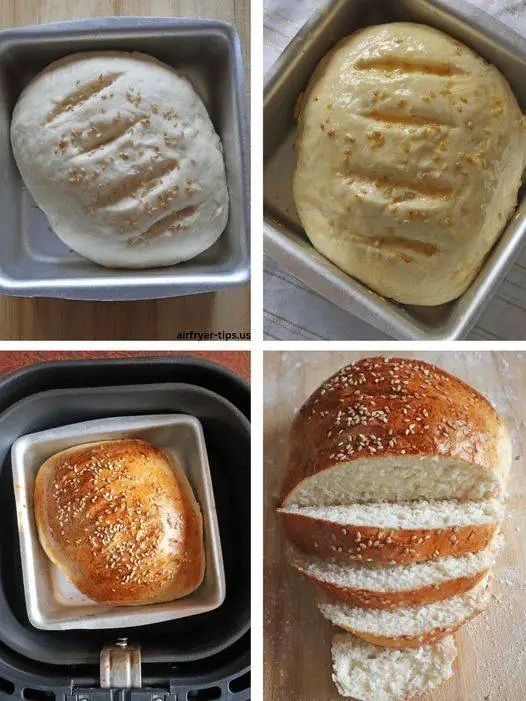
👩🍳 Step-by-Step Instructions
1. Activate the Yeast
-
In a large mixing bowl, combine warm water, sugar, and yeast.
-
Let it sit for 5-10 minutes until it becomes frothy and bubbly.
🧠 Tip: If it doesn’t foam, your yeast might be expired.
2. Mix the Dough
-
Add olive oil and salt to the yeast mixture.
-
Slowly incorporate the flour one cup at a time.
-
Mix with a wooden spoon or dough hook until a shaggy dough forms.
3. Knead the Dough
-
Knead for 8–10 minutes by hand or 5–7 minutes with a stand mixer.
-
The dough should be smooth, elastic, and slightly tacky but not sticky.
🧠 Tip: If too sticky, add flour 1 tbsp at a time. If too dry, add a splash of water.
4. First Rise (Proofing)
-
Form the dough into a ball and place it in a greased bowl.
-
Cover with a towel or plastic wrap.
-
Let it rise in a warm place for 1 to 1.5 hours until doubled in size.
5. Shape the Dough
-
Punch down the dough gently to release air.
-
Shape it into a round or oval loaf depending on your pan size.
-
Place the dough into a greased air fryer-safe pan or on parchment paper.
6. Second Rise
-
Cover the dough again and let it rise for 30–45 minutes until puffy.
-
Optional: Brush the top with egg wash (1 egg + 1 tbsp water) or melted butter.
7. Preheat the Air Fryer
-
Preheat to 160°C (320°F) for 3–5 minutes.
8. Bake the Bread
-
Carefully place the pan into the preheated air fryer.
-
Bake at 160°C (320°F) for 20 minutes.
-
Then increase the temperature to 180°C (350°F) and bake for another 5–10 minutes until golden brown and hollow-sounding when tapped.
🧠 Internal temp should reach 90–95°C (195–200°F).
9. Cool and Serve
-
Remove the bread and let it cool on a wire rack.
-
Slice and enjoy!
🍞 Variations and Add-ins
Get creative! Once you’ve mastered the basic recipe, try these variations:
🧄 Garlic & Herb Bread
-
Add minced garlic, dried oregano, and rosemary to the dough.
🧀 Cheese Bread
-
Mix in ½ cup shredded cheddar or parmesan before kneading.
🌾 Multigrain or Whole Wheat
-
Replace 1 cup all-purpose flour with whole wheat or oat flour.
🥜 Seeded Bread
-
Top with sesame, poppy, or sunflower seeds before baking.
🍯 Sweet Version
-
Add cinnamon, raisins, or swirl in honey for a breakfast loaf.
🥖 Storing and Reheating
🧊 Storing
-
Keep in an airtight container at room temp for up to 3 days.
-
For longer storage, wrap and freeze for up to 3 months.
🔥 Reheating
-
Air fryer: 140°C (285°F) for 3–5 minutes
-
Toaster or oven: until warm and crisp
-
Microwave: 10–15 seconds (note: softens crust)
⚠️ Troubleshooting Tips
| Problem | Solution |
|---|---|
| Bread too dense | Knead longer; make sure yeast is fresh |
| Not rising enough | Proof in a warmer spot; check yeast activation |
| Too dry or crusty | Cover with foil halfway through baking |
| Top burning | Lower the temperature; rotate or cover with parchment |
| Bread collapses after baking | Over-proofed; reduce second rise time |
🍽️ Serving Suggestions
Pair your homemade bread with:
-
Warm soups (tomato, minestrone, chicken noodle)
-
Air fryer roasted vegetables
-
Homemade butter or flavored cream cheese
-
Sandwich fillings like turkey, ham, or grilled veggies
-
Olive oil and balsamic vinegar dip
📏 Nutritional Info (Per Slice, Approximate)
-
Calories: 160 kcal
-
Protein: 4g
-
Carbohydrates: 28g
-
Fat: 3g
-
Fiber: 1g
-
Sugar: 1g
(Values depend on ingredients and variations used.)
✅ Final Thoughts and Conclusion
Baking homemade bread in an air fryer may sound like a culinary experiment, but it’s surprisingly simple, fast, and rewarding. You don’t need a fancy bread machine, oven, or bakery skills. With just a few basic ingredients and an hour or two, you can enjoy the satisfaction of slicing into a warm, fluffy, homemade loaf—crafted entirely in your countertop appliance.
What makes this process so appealing is its adaptability. You can use the basic method and tweak it to suit your taste, whether you prefer savory flavors like garlic and herbs, or sweet combinations like cinnamon raisin. Plus, it’s a perfect weekend activity, fun for kids and beginners alike.
The air fryer opens up a world of possibilities for home cooks, and this bread recipe is just the beginning. Try different flours, play with shapes, or turn your air fryer loaf into croutons, French toast, or bread pudding.
So next time you’re craving the warmth and comfort of homemade bread, skip the oven. Let your air fryer do the magic. Your kitchen will smell amazing, your taste buds will thank you, and your family will wonder how you pulled it off so easily.
Bon appétit! 🥖