
Homemade Brioche with Milk: The Perfect Buttery Loaf from Your Own Kitchen
Introduction
Few things in the world of baking can match the luxurious richness, soft crumb, and slightly sweet aroma of freshly baked brioche. Originating in France, brioche is a bread that bridges the gap between pastry and bread. While it contains yeast like traditional bread, it’s enriched with butter, eggs, and milk, giving it a tender texture that almost melts in your mouth.
In this comprehensive article, we will dive deeply into the world of homemade brioche with milk — one of the most comforting and rewarding versions of this classic bread. Using milk as one of the primary liquids in the dough adds a touch of creaminess, enhances the softness of the loaf, and contributes to a beautiful golden crust.
Whether you’re a seasoned home baker or a beginner looking to try your hand at enriched bread, this guide will walk you step-by-step through the entire process, providing expert tips, troubleshooting advice, and variations to make this your go-to brioche recipe.
Let’s begin our journey into creating the ultimate Homemade Brioche with Milk.
Why Milk Brioche?
Milk in brioche serves multiple purposes:
-
Softness: The fats and proteins in milk contribute to a tender crumb.
-
Flavor: Milk adds a subtle sweetness and depth to the dough.
-
Crust color: The lactose in milk caramelizes during baking, creating a beautiful golden brown crust.
-
Moisture: Milk helps retain moisture, keeping the brioche soft for days.
This makes milk brioche an excellent choice for breakfast, brunch, or any time you want a slice of heaven.
Ingredients: Understanding Each Component
Before we proceed to the actual recipe, it’s important to understand the role of each ingredient:
-
All-purpose flour or bread flour: The backbone of the dough. Bread flour creates a slightly chewier texture while all-purpose flour makes it softer.
-
Whole milk: Adds richness and softness.
-
Active dry yeast or instant yeast: The leavening agent responsible for fermentation and rise.
-
Granulated sugar: Provides sweetness and feeds the yeast.
-
Salt: Balances the sweetness and strengthens gluten structure.
-
Large eggs: Enrich the dough and provide structure.
-
Unsalted butter: The star ingredient that gives brioche its signature richness.
-
Egg wash (egg + milk): For a shiny, golden crust.
Equipment You Will Need
-
Stand mixer with dough hook (highly recommended)
-
Mixing bowls
-
Measuring cups and spoons or kitchen scale
-
Plastic wrap or clean kitchen towel
-
Loaf pans or brioche molds
-
Pastry brush
-
Oven
The Complete Recipe for Homemade Brioche with Milk
Ingredients
For the Dough:
-
500 grams (4 cups) bread flour or all-purpose flour
-
10 grams (2 teaspoons) active dry yeast or instant yeast
-
60 grams (1/3 cup) granulated sugar
-
10 grams (1 ½ teaspoons) salt
-
4 large eggs (room temperature)
-
120 ml (½ cup) whole milk (lukewarm)
-
170 grams (¾ cup) unsalted butter (softened, cut into cubes)
For the Egg Wash:
-
1 egg
-
1 tablespoon whole milk
Step-by-Step Instructions
1. Activate the Yeast
If using active dry yeast, activate it by dissolving it in lukewarm milk with a pinch of sugar. Let it sit for 5-10 minutes until frothy. If using instant yeast, you can skip this step and mix it directly into the flour.
Tip: The milk should be between 100°F and 110°F (37°C-43°C). Too hot will kill the yeast; too cold will slow fermentation.
2. Prepare the Dough
-
In the bowl of your stand mixer, combine flour, sugar, and salt.
-
Make a well in the center and add the yeast mixture (or instant yeast), eggs, and remaining milk.
-
Using the dough hook attachment, mix on low speed until a shaggy dough forms.
-
Increase speed to medium and knead for 5-7 minutes until the dough starts to become elastic.
3. Incorporate the Butter
-
Reduce mixer speed to low.
-
Gradually add the softened butter, one cube at a time, allowing each piece to incorporate before adding the next.
-
Once all butter is incorporated, increase speed to medium and knead for 10-15 minutes. The dough should be smooth, elastic, and slightly sticky but not wet.
-
If necessary, scrape down the sides and bottom to ensure even mixing.
Tip: Patience is key here. The dough will initially look greasy, but continued kneading will fully incorporate the butter.
4. First Rise (Bulk Fermentation)
-
Transfer the dough to a lightly greased bowl.
-
Cover with plastic wrap or a clean kitchen towel.
-
Let rise at room temperature for 1.5 to 2 hours or until doubled in size.
Alternative: You can refrigerate the dough overnight (8-12 hours). This slows fermentation, enhances flavor, and makes the dough easier to handle.
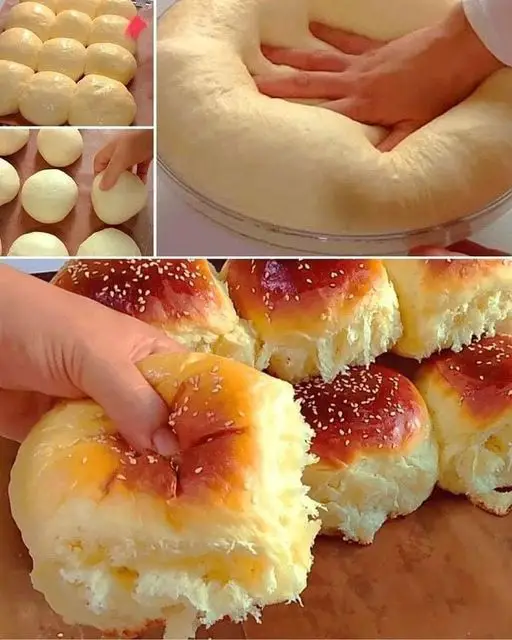
5. Shaping the Dough
-
If refrigerated, let the dough sit at room temperature for 30 minutes to soften.
-
Turn the dough out onto a lightly floured surface.
-
Gently deflate it and divide into equal portions depending on your pan size.
-
Shape into balls or braid for a classic braided brioche.
Example shapes:
Loaf: Place portions side by side in a loaf pan.
Braided: Braid three strands and place on a lined baking tray.
Individual buns: Portion into small balls and place in a muffin tin.
6. Second Rise (Proofing)
-
Cover shaped dough lightly with plastic wrap or towel.
-
Allow to rise for 60-90 minutes at room temperature until puffy and nearly doubled in size.
Test for readiness: Gently press a finger into the dough. If it springs back slowly, it’s ready to bake.
7. Egg Wash
-
Whisk together 1 egg and 1 tablespoon milk.
-
Gently brush the surface of the dough with egg wash. This ensures a beautiful golden crust.
8. Baking
-
Preheat the oven to 175°C (350°F).
-
Bake:
-
Loaves: 30-35 minutes
-
Buns: 15-20 minutes
-
Braided loaves: 25-30 minutes
-
Tip: If browning too quickly, loosely cover with foil for the last 10 minutes.
-
The internal temperature should reach approximately 90°C (195°F).
9. Cooling
-
Remove from the oven and allow to cool in the pan for 10 minutes.
-
Transfer to a wire rack to cool completely before slicing.
Troubleshooting Guide
| Problem | Possible Cause | Solution |
|---|---|---|
| Dough too sticky | Butter not fully incorporated | Knead longer |
| Dough not rising | Inactive yeast | Use fresh yeast; check milk temperature |
| Dense loaf | Under-proofed or over-proofed | Monitor rise times carefully |
| Pale crust | Not enough egg wash | Apply egg wash thoroughly |
| Dry brioche | Overbaked | Use thermometer to check internal temp |
Variations
1. Chocolate Chip Brioche
-
Add ¾ cup mini chocolate chips during final kneading.
2. Brioche Nanterre
-
Traditional French loaf made with small dough balls placed side by side.
3. Fruit-Studded Brioche
-
Mix in raisins, candied orange peel, or dried cranberries.
4. Savory Brioche
-
Omit sugar and add herbs, cheese, or bacon for a savory twist.
Serving Ideas
-
Breakfast toast with butter and jam
-
French toast: Soaks up custard perfectly
-
Bread pudding with leftover brioche
-
Gourmet sandwiches (ham & brie or turkey & cranberry)
-
Brioche buns for burgers or sliders
Storage and Freezing
-
Store at room temperature in an airtight container for 3-4 days.
-
Freeze well-wrapped loaves for up to 3 months.
-
Thaw overnight and refresh in a low oven if needed.
Nutritional Information (Approximate per slice)
-
Calories: 220
-
Fat: 10g
-
Carbs: 25g
-
Protein: 5g
-
Sugar: 5g
Note: Nutritional values will vary based on portion size and variations.
The Science Behind Brioche’s Unique Texture
The combination of rich fats (butter, eggs, and milk) and extended kneading develops strong gluten strands. These strands trap gases produced by the yeast, creating a light, pillowy crumb. The fat also tenderizes the dough, making each bite melt in your mouth.
The slow fermentation allows complex flavors to develop, enhancing brioche’s characteristic taste. The final golden sheen results from the Maillard reaction, where proteins and sugars caramelize under heat.
Common Mistakes to Avoid
-
Rushing fermentation: Brioche benefits from slow rising.
-
Too much flour: Avoid adding excessive flour during kneading.
-
Improper butter temperature: Butter should be soft but not melted.
-
Skipping egg wash: The beautiful crust depends on it.
-
Underbaking or overbaking: Use a thermometer for best results.
Mastering the Art: Advanced Tips
-
Cold Butter Method: Some bakers prefer adding cold butter in small pieces for better layering.
-
Overnight Proofing: Enhances flavor and makes shaping easier.
-
Sourdough Brioche: Substitute part of the yeast with sourdough starter for depth.
-
Double Egg Wash: Brush once before proofing and again before baking for extra gloss.
Conclusion
Making Homemade Brioche with Milk may initially seem intimidating due to its enriched nature, but with patience and attention to detail, anyone can achieve bakery-quality brioche at home. The reward is a soft, buttery, golden loaf that fills your kitchen with an irresistible aroma and satisfies every bite.
Brioche is incredibly versatile. Whether you’re enjoying it fresh, toasted, or incorporated into other recipes like French toast or bread pudding, it elevates any meal. As you become more comfortable with the process, you can experiment with flavors, fillings, and shapes to create your personalized version of this classic French bread.
By mastering this recipe, you’re not only baking bread—you’re embracing a time-honored tradition that brings warmth and delight to every table.
