
🍰 Victoria Sponge Cake in the Air Fryer: A Classic Treat Made Easier
Introduction
The Victoria sponge cake, also known as the Victoria sandwich, is a quintessential British dessert named after Queen Victoria herself. Known for its delicate crumb, lightly sweetened layers, and a delightful filling of jam and whipped cream, it’s a staple at afternoon teas and special occasions across the United Kingdom. Traditionally baked in an oven, this iconic treat has undergone a modern transformation — now perfectly adaptable to the air fryer.
With the rise in popularity of air fryers for their convenience, speed, and energy efficiency, bakers and dessert lovers are increasingly looking for ways to adapt classic recipes for this countertop appliance. The air fryer is no longer just for crispy fries and roasted vegetables — it can also produce beautifully risen sponge cakes that rival those made in a conventional oven.
In this article, we will walk you through the process of making a Victoria Sponge Cake in an air fryer, step-by-step. From the perfect ratio of ingredients to the technique that ensures lightness and moisture, you’ll have everything you need to recreate this timeless dessert — but with a modern twist.
Recipe: Victoria Sponge Cake in the Air Fryer
Ingredients
For the Sponge:
-
200g (1 cup) unsalted butter, softened
-
200g (1 cup) caster sugar
-
4 large eggs
-
200g (1⅓ cups) self-raising flour
-
1 tsp baking powder
-
2 tbsp milk (room temperature)
-
1 tsp pure vanilla extract
-
A pinch of salt
For the Filling:
-
150ml double cream (heavy cream), whipped
-
4 tbsp raspberry jam or strawberry jam (preferably seedless)
-
Optional: Fresh strawberries, sliced thinly
For Decoration:
-
Icing sugar for dusting
Equipment
-
Air fryer (basket or oven style, minimum 5-liter capacity recommended)
-
Two 6-inch round cake tins (that fit into your air fryer basket or tray)
-
Parchment paper
-
Mixing bowls
-
Hand or stand mixer
-
Spatula
-
Wire rack
Preparation Steps
1. Prepping the Cake Tins
Before you even begin creaming the butter and sugar, line the base of your 6-inch cake tins with parchment paper. Lightly grease the sides with butter or cooking spray to prevent sticking. This ensures that the cakes will lift out cleanly after baking.
2. Creaming Butter and Sugar
In a large mixing bowl, use a hand mixer or stand mixer to cream the butter and caster sugar until pale, fluffy, and light. This step is crucial — proper aeration at this stage helps create a soft and spongy texture.
3. Adding the Eggs
Crack the eggs into a small bowl and lightly beat them. Gradually add them into the butter-sugar mixture while mixing continuously. Add about one egg at a time to prevent curdling. If the mixture appears to curdle, add a tablespoon of flour to bring it back together.
4. Incorporating Dry Ingredients
Sift the self-raising flour, baking powder, and salt into the wet mixture. Fold gently using a spatula or a wooden spoon. Avoid overmixing, as it can deflate the air incorporated earlier and result in a dense cake.
5. Adding Milk and Vanilla
Stir in the milk and vanilla extract. The milk helps loosen the batter slightly, making it easier to spread evenly into the tins.
6. Dividing and Spreading the Batter
Divide the batter evenly between the two prepared cake tins. Use the back of a spoon or spatula to level the tops. This ensures even rising in the air fryer.
Cooking in the Air Fryer
1. Preheat the Air Fryer
Preheat your air fryer to 150°C (300°F) for 3–5 minutes. Preheating helps achieve a more consistent rise and bake.
2. Bake the Sponge
Place one cake tin at a time in the air fryer basket (or both if your air fryer is wide enough to fit two tins side-by-side without overcrowding). Air fry at 150°C (300°F) for 20–25 minutes.
Check for doneness by inserting a toothpick into the center — it should come out clean. The tops should be golden brown and spring back when lightly pressed.
Note: Air fryer models vary in power. You may need to adjust the time by 2–3 minutes based on your machine’s performance.
3. Cooling the Cakes
Once baked, allow the sponges to cool in their tins for 10 minutes. Then gently turn them out onto a wire rack to cool completely.
Assembling the Victoria Sponge
1. Prepare the Cream
While the cakes are cooling, whip the double cream until soft peaks form. Do not overwhip — the cream should hold its shape but remain smooth.
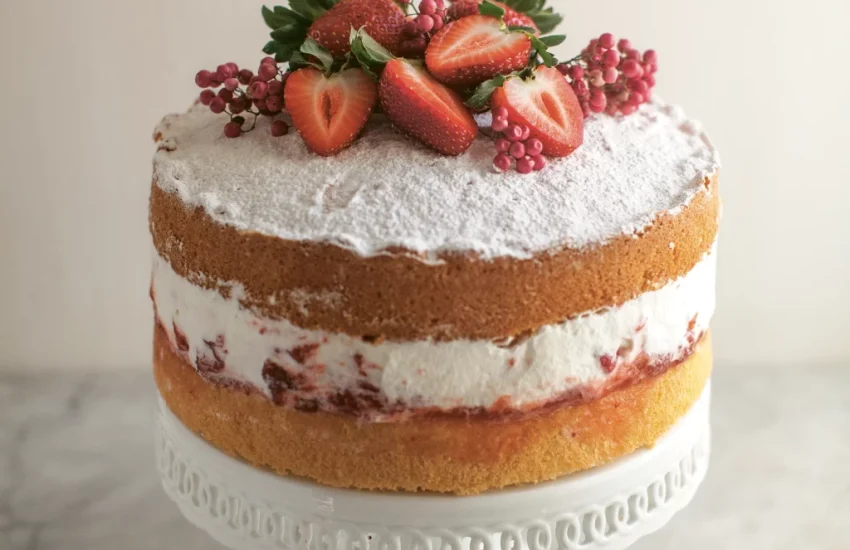
2. Layer with Jam and Cream
Place one sponge layer on a serving plate. Spread a generous layer of raspberry or strawberry jam across the surface. Then spread the whipped cream over the jam. You can also add thin slices of fresh strawberries for extra freshness and texture.
Top with the second sponge, placing it gently over the filling.
3. Dust with Icing Sugar
Finish the cake with a light dusting of icing sugar for a classic and elegant touch.
Optional Variations
1. Lemon Victoria Sponge:
Add the zest of 1 lemon to the sponge batter and use lemon curd instead of jam for a bright, citrusy twist.
2. Chocolate Victoria Sponge:
Substitute 30g of the flour with cocoa powder for a chocolaty version. Fill with whipped chocolate ganache and raspberry jam.
3. Vegan Version:
Use vegan butter, flaxseed “eggs” (1 tbsp ground flaxseed + 3 tbsp water per egg), plant-based milk, and a coconut cream filling for a vegan-friendly version.
4. Gluten-Free Version:
Replace self-raising flour with a gluten-free self-raising blend and ensure all other ingredients are certified gluten-free.
Tips for Success in the Air Fryer
1. Size Matters
Use cake tins that fit comfortably in your air fryer. A 6-inch round tin is typically the best size for most air fryer baskets.
2. Don’t Overfill
Air fryers need space for air to circulate. Never overfill your tins or place the tins too close together.
3. Test Your Air Fryer
The first time making a sponge cake in your air fryer might require a little trial and error. Keep notes on what temperature and timing work best for your specific model.
4. Keep the Heat Low
Unlike conventional ovens, air fryers bake faster due to convection. A lower temperature (150°C/300°F) helps prevent the top from browning too fast before the middle cooks through.
5. Cooling Time Is Essential
Air fryer cakes retain heat longer. Let them cool fully before filling or decorating to avoid melted cream or soggy centers.
Conclusion
The Victoria Sponge Cake, with its soft texture, jammy sweetness, and creamy richness, is a cherished dessert with timeless appeal. Thanks to the efficiency and versatility of the air fryer, you can now enjoy this elegant treat with less fuss, less energy consumption, and in less time than a traditional oven would require.
Making a Victoria sponge in the air fryer not only modernizes the baking experience but also opens up new possibilities for those with limited kitchen space or looking for quicker, more efficient methods. Whether you’re hosting a tea party, celebrating a special occasion, or simply treating yourself to something sweet, this air fryer version delivers all the joy and flavor of the original.
So preheat that air fryer, gather your ingredients, and get ready to create a light, airy, and utterly delightful Victoria Sponge Cake that will impress anyone who takes a bite. Baking has never been this easy — or this delicious!