
🧼 How to Clean an Air Fryer
Keep Your Favorite Kitchen Appliance Sparkling and Odor-Free
Introduction: Why Cleaning Your Air Fryer Matters
The air fryer has become one of the most beloved kitchen gadgets in modern cooking. It offers the crispy textures of deep-fried food—without the guilt, the mess, or the heavy oil. From golden onion rings and juicy chicken quarters to delicate desserts and roasted vegetables, the air fryer can do it all.
But as convenient as it is, your air fryer won’t stay magical forever if you don’t take care of it. Grease builds up, crumbs burn at the bottom, and lingering odors from previous meals can ruin new dishes. Regular cleaning not only keeps your appliance looking new, but also ensures that every dish tastes just as it should—crisp, clean, and delicious.
In this complete guide, you’ll learn exactly how to clean your air fryer like a pro, using simple household products and easy techniques. We’ll break it down step-by-step—from quick daily cleaning to deep monthly maintenance—and share expert tips for removing stubborn grease, odors, and stuck-on food.
Think of this as your “cleaning recipe.” Just as each dish requires the right balance of ingredients and timing, your air fryer deserves the same attention to detail. With a few minutes of care after each use, you’ll extend its lifespan, maintain performance, and keep your favorite meals tasting their best.
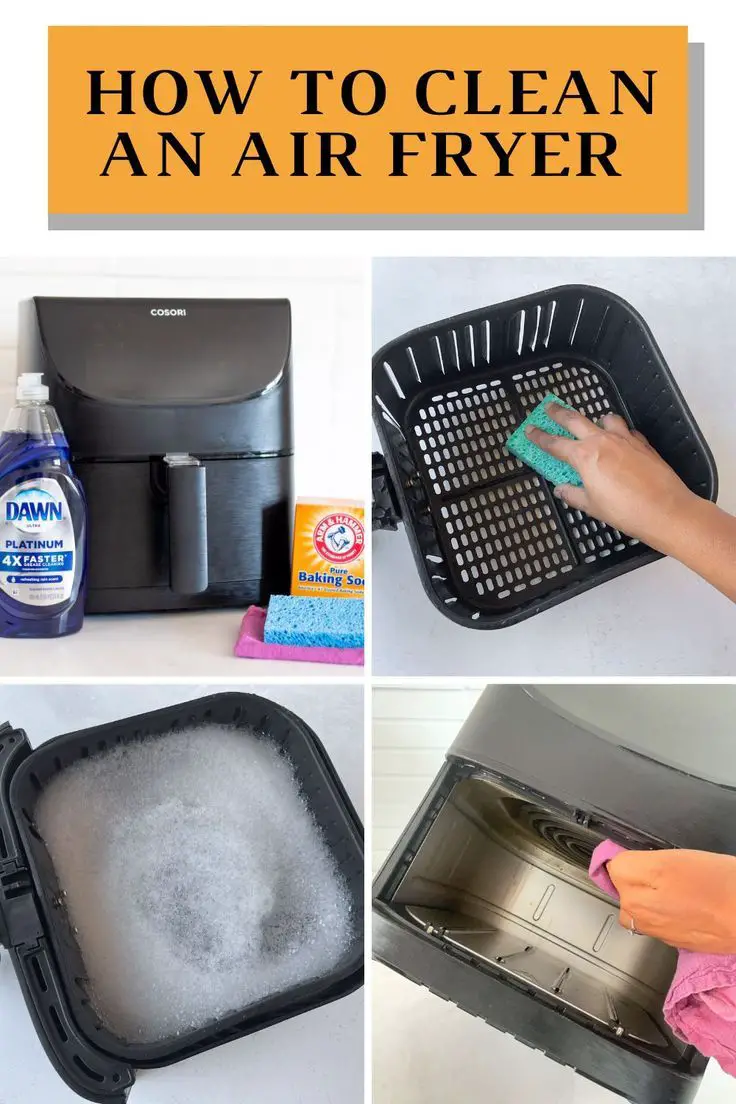
Ingredients (What You’ll Need)
Before you start cleaning, gather everything you’ll need. Treat this section like the ingredients list of your recipe:
-
🧴 Dish soap: Mild, grease-cutting detergent (avoid harsh chemicals)
-
🧽 Soft sponge or microfiber cloth: Gentle on nonstick surfaces
-
🪣 Warm water
-
🧻 Paper towels or soft drying cloth
-
🪠 Soft-bristle brush or old toothbrush: Perfect for scrubbing crevices
-
🧼 Baking soda: Great for stubborn grease buildup
-
🍋 White vinegar or lemon juice: Natural deodorizer and disinfectant
-
🧤 Rubber gloves: Optional, for those with sensitive skin
-
🧹 Small brush or vacuum cleaner: For crumbs around heating elements
If you clean your air fryer regularly, most of the time you’ll only need dish soap, warm water, and a soft sponge. But for deeper cleans or old grease, having baking soda and vinegar on hand makes the process much easier.
Step-by-Step Cleaning Guide (The “Recipe”)
Just like cooking, the cleaning process can be divided into stages: preparation, washing, drying, and maintenance. Each one is essential for keeping your air fryer in top shape.
Step 1: Unplug and Cool Down
Safety first!
Before you even think about cleaning your air fryer, unplug it and make sure it’s completely cool. Never clean it while it’s still warm or plugged in, as this could cause electrical shock or damage the unit.
If you’ve just finished cooking, let the air fryer sit for at least 30–45 minutes to cool completely. You can speed this up by removing the basket or drawer and leaving them on a heat-resistant surface to release steam.
Step 2: Remove the Basket, Pan, and Accessories
Once cooled, take out the basket, pan, and any removable accessories (like racks, skewers, or trays). These parts usually accumulate most of the grease, crumbs, and cooking residue.
Check your air fryer’s manual to confirm which parts are dishwasher safe—most modern models (like Philips, Cosori, or Ninja) allow the basket and pan to go in the dishwasher. However, hand-washing is usually better for preserving the nonstick coating over time.
Step 3: Soak the Basket and Pan
Fill your sink or a large basin with warm, soapy water. Add a few drops of mild dish soap and immerse the removable parts. Let them soak for 10–15 minutes to loosen any stuck-on food or grease.
If you’ve cooked something extra greasy (like bacon or chicken wings), you can sprinkle a bit of baking soda directly onto stubborn spots before soaking—it helps break down oil and odor naturally.
Step 4: Clean the Basket and Pan
After soaking, use a soft sponge or brush to gently scrub the inside and outside of each piece. Avoid using steel wool, scouring pads, or metal brushes, which can scratch and ruin the nonstick surface.
Rinse thoroughly with warm water to remove all soap, then dry completely with a towel or let them air-dry.
💡 Pro tip: If food particles are stuck in the basket holes, use a soft toothbrush or toothpick to gently remove them.
Step 5: Wipe Down the Interior
Now that the removable parts are clean, it’s time to tackle the inside of the air fryer.
Using a damp cloth or sponge with a bit of dish soap, gently wipe the heating chamber, walls, and bottom. Be cautious not to let water drip into the heating element or electrical components.
If your model allows access to the heating element, flip the air fryer upside down or at an angle to clean it. Use a soft brush or dry cloth to remove crumbs and debris.
For stubborn grease buildup:
-
Mix one tablespoon of baking soda with one tablespoon of water to create a paste.
-
Gently rub it on the greasy area with a soft cloth.
-
Wipe away with a clean damp sponge.
Step 6: Clean the Heating Element
This step is often overlooked, but it’s one of the most important for keeping your air fryer odor-free and efficient.
Turn the air fryer upside down so you can see the heating coil. Wipe it gently with a damp cloth or soft brush to remove splatters of oil or crumbs.
If there’s stuck residue, use a mixture of vinegar and water (1:1) on a cloth to cut through the grease. Avoid spraying anything directly into the element.
Once clean, let it dry completely before turning the air fryer right-side up again.
Step 7: Wipe the Exterior
Don’t forget the outside!
Use a damp cloth with a small amount of dish soap to wipe the outer casing, handle, and control panel. Dry immediately with a soft towel to prevent streaks.
For digital screens or touch panels, you can use a microfiber cloth slightly dampened with water or white vinegar—never use alcohol or abrasive cleaners.
Step 8: Reassemble and Run a Test Cycle
Once all parts are clean and dry, reassemble your air fryer. Plug it in, and if you want to ensure everything is dry inside, run a short 3-minute air fry cycle at 180°C (350°F) with an empty basket.
This helps evaporate any remaining moisture and refreshes the interior.
Step 9: Deodorize Naturally (Optional)
If your air fryer still smells of fish, onions, or bacon, try this natural deodorizing trick:
-
Mix 1 tablespoon of white vinegar and 1 tablespoon of lemon juice in a small oven-safe bowl.
-
Place it in the basket.
-
Run the air fryer at 180°C (350°F) for 3–5 minutes.
The steam will neutralize odors, leaving your air fryer smelling fresh and clean.
Step 10: Deep Cleaning (Monthly Routine)
Even with regular wiping, your air fryer will eventually need a deep clean. Once a month (or after particularly greasy meals), dedicate 30 minutes to give it full attention.
This includes:
-
Cleaning the heating element thoroughly
-
Washing the air intake and exhaust vents with a brush
-
Checking for oil residue around the fan
-
Inspecting the cord and plug for grease buildup
If you see burnt residue that won’t come off, repeat the baking soda paste treatment or soak overnight with warm water and dish soap.
Special Cleaning Situations
Different types of food leave different messes. Here’s how to handle specific cleaning challenges:
🥓 Greasy Foods (Bacon, Chicken Wings, Fries)
Grease can splatter and build up quickly. To prevent issues:
-
Place a small piece of parchment paper under food when cooking.
-
After cooking, empty the grease tray before it cools completely.
-
Clean immediately—don’t let grease harden overnight.
🧀 Sticky or Burnt Foods (Cheese, Sauces, Caramel)
-
Fill the basket with warm soapy water immediately after use.
-
Let it soak for at least 30 minutes.
-
Use baking soda paste to remove burnt sugar or cheese residue.
🐟 Strong Odors (Fish, Onions, Garlic)
-
Wash all parts with vinegar-infused water.
-
Run the lemon-vinegar deodorizing cycle afterward.
-
Leave the basket open overnight to air out.
🍰 Sweet Dishes (Cakes, Muffins, Pastries)
-
These usually don’t cause strong odors but may leave crumbs.
-
Use a dry brush or vacuum for crumbs.
-
Avoid using harsh soap scents that could linger in your next savory dish.
Maintenance Tips: Keep Your Air Fryer Like New
Think of this section as your “storage and serving” advice—how to maintain the results of your cleaning.
💨 1. Clean After Every Use
Even a quick wipe goes a long way. Leaving residue inside will harden over time and become much harder to remove.
⚙️ 2. Don’t Submerge the Main Unit
Only the basket, pan, and accessories should touch water. The main body contains electrical parts and should only ever be wiped down.
🌬️ 3. Let It Dry Completely
Never reassemble or use the air fryer while any part is still damp. Moisture can affect performance and cause rust on internal components.
🧂 4. Avoid Aerosol Sprays
Oil sprays with propellants can damage the nonstick coating and cause sticky buildup. Use a spray bottle with pure oil instead.
🧽 5. Replace Accessories When Needed
If your basket’s coating starts peeling or your tray becomes rusted, replace them immediately. Cooking with damaged surfaces can release unwanted particles.
🪞 6. Store Properly
Keep your air fryer in a dry, ventilated area with enough space around it. Avoid stacking heavy objects on top, especially near the control panel.
Troubleshooting Common Issues
Even with regular cleaning, you might run into a few issues. Here’s how to fix them safely:
| Problem | Possible Cause | Solution |
|---|---|---|
| White smoke during cooking | Excess grease or oil residue | Clean basket and base after every use; don’t overload food |
| Black smoke | Burnt food particles | Stop cooking, unplug, let cool, clean basket and heating element |
| Bad odor | Old grease or trapped food | Use vinegar-lemon deodorizing cycle |
| Sticky basket | Too much oil buildup | Soak in hot, soapy water with baking soda |
| Uneven heating | Fan blocked by debris | Clean vents and heating coil area thoroughly |
Advanced Cleaning Hacks (For Enthusiasts)
For those who love keeping things spotless:
-
🧴 DIY Degreaser: Mix 2 tablespoons of baking soda, 2 tablespoons of vinegar, and a few drops of dish soap in warm water. Use this for heavy grease cleaning.
-
🌸 Scent Refresh: Add a few drops of vanilla extract or essential oils to the lemon-vinegar mix when deodorizing.
-
💡 Steam-Clean Shortcut: Place a bowl of hot water and vinegar inside the basket, close the lid, and let it sit for 15 minutes. The steam loosens stuck residue.
Pro Tips (From Air Fryer Experts)
-
Prevention is easier than cure: Line the basket with parchment paper or foil (if your manual allows it).
-
Don’t overload: Air circulation matters. Overcrowding leads to burnt bits that make cleaning harder.
-
Regular mini-cleans: Even a 2-minute wipe after cooking makes deep cleaning easier later.
-
Use soft tools only: Non-abrasive sponges preserve the coating.
-
Know your model: Always check the manufacturer’s cleaning guide for specific warnings or dishwasher safety notes.
Conclusion: A Clean Air Fryer Is a Happy Air Fryer
Your air fryer is more than a kitchen gadget—it’s a daily companion that helps you cook faster, healthier, and cleaner. But like any good friend, it deserves regular care and attention.
By following these simple steps, you’ll not only extend your air fryer’s lifespan but also improve the taste and safety of your meals. Every onion ring will come out crisp, every chicken perfectly browned, and every dessert free of old odors.
Cleaning doesn’t have to be a chore. Think of it as the final step in your cooking ritual—a moment to reset your kitchen, refresh your tools, and prepare for your next delicious air-fried creation.
So next time you finish cooking those golden fries or crispy cauliflower bites, give your air fryer a little TLC. Your future self (and your taste buds) will thank you!
